PayTo Integration Process
This page outlines the steps for how to will setup PayTo and provide PayTo as a payment option in your application.
How PayTo Integration Works

Pre-requisite
To have PayTo enabled for merchants, integrators will need request to have this option available with Ezypay.
Once the PayTo payment method option is enabled, the Ezypay Hosted Payment Page will automatically provide the end customer with the PayTo payment method option.The PayTo payment option is only available in Australia.
Detailed Steps on How to Integrate PayTo
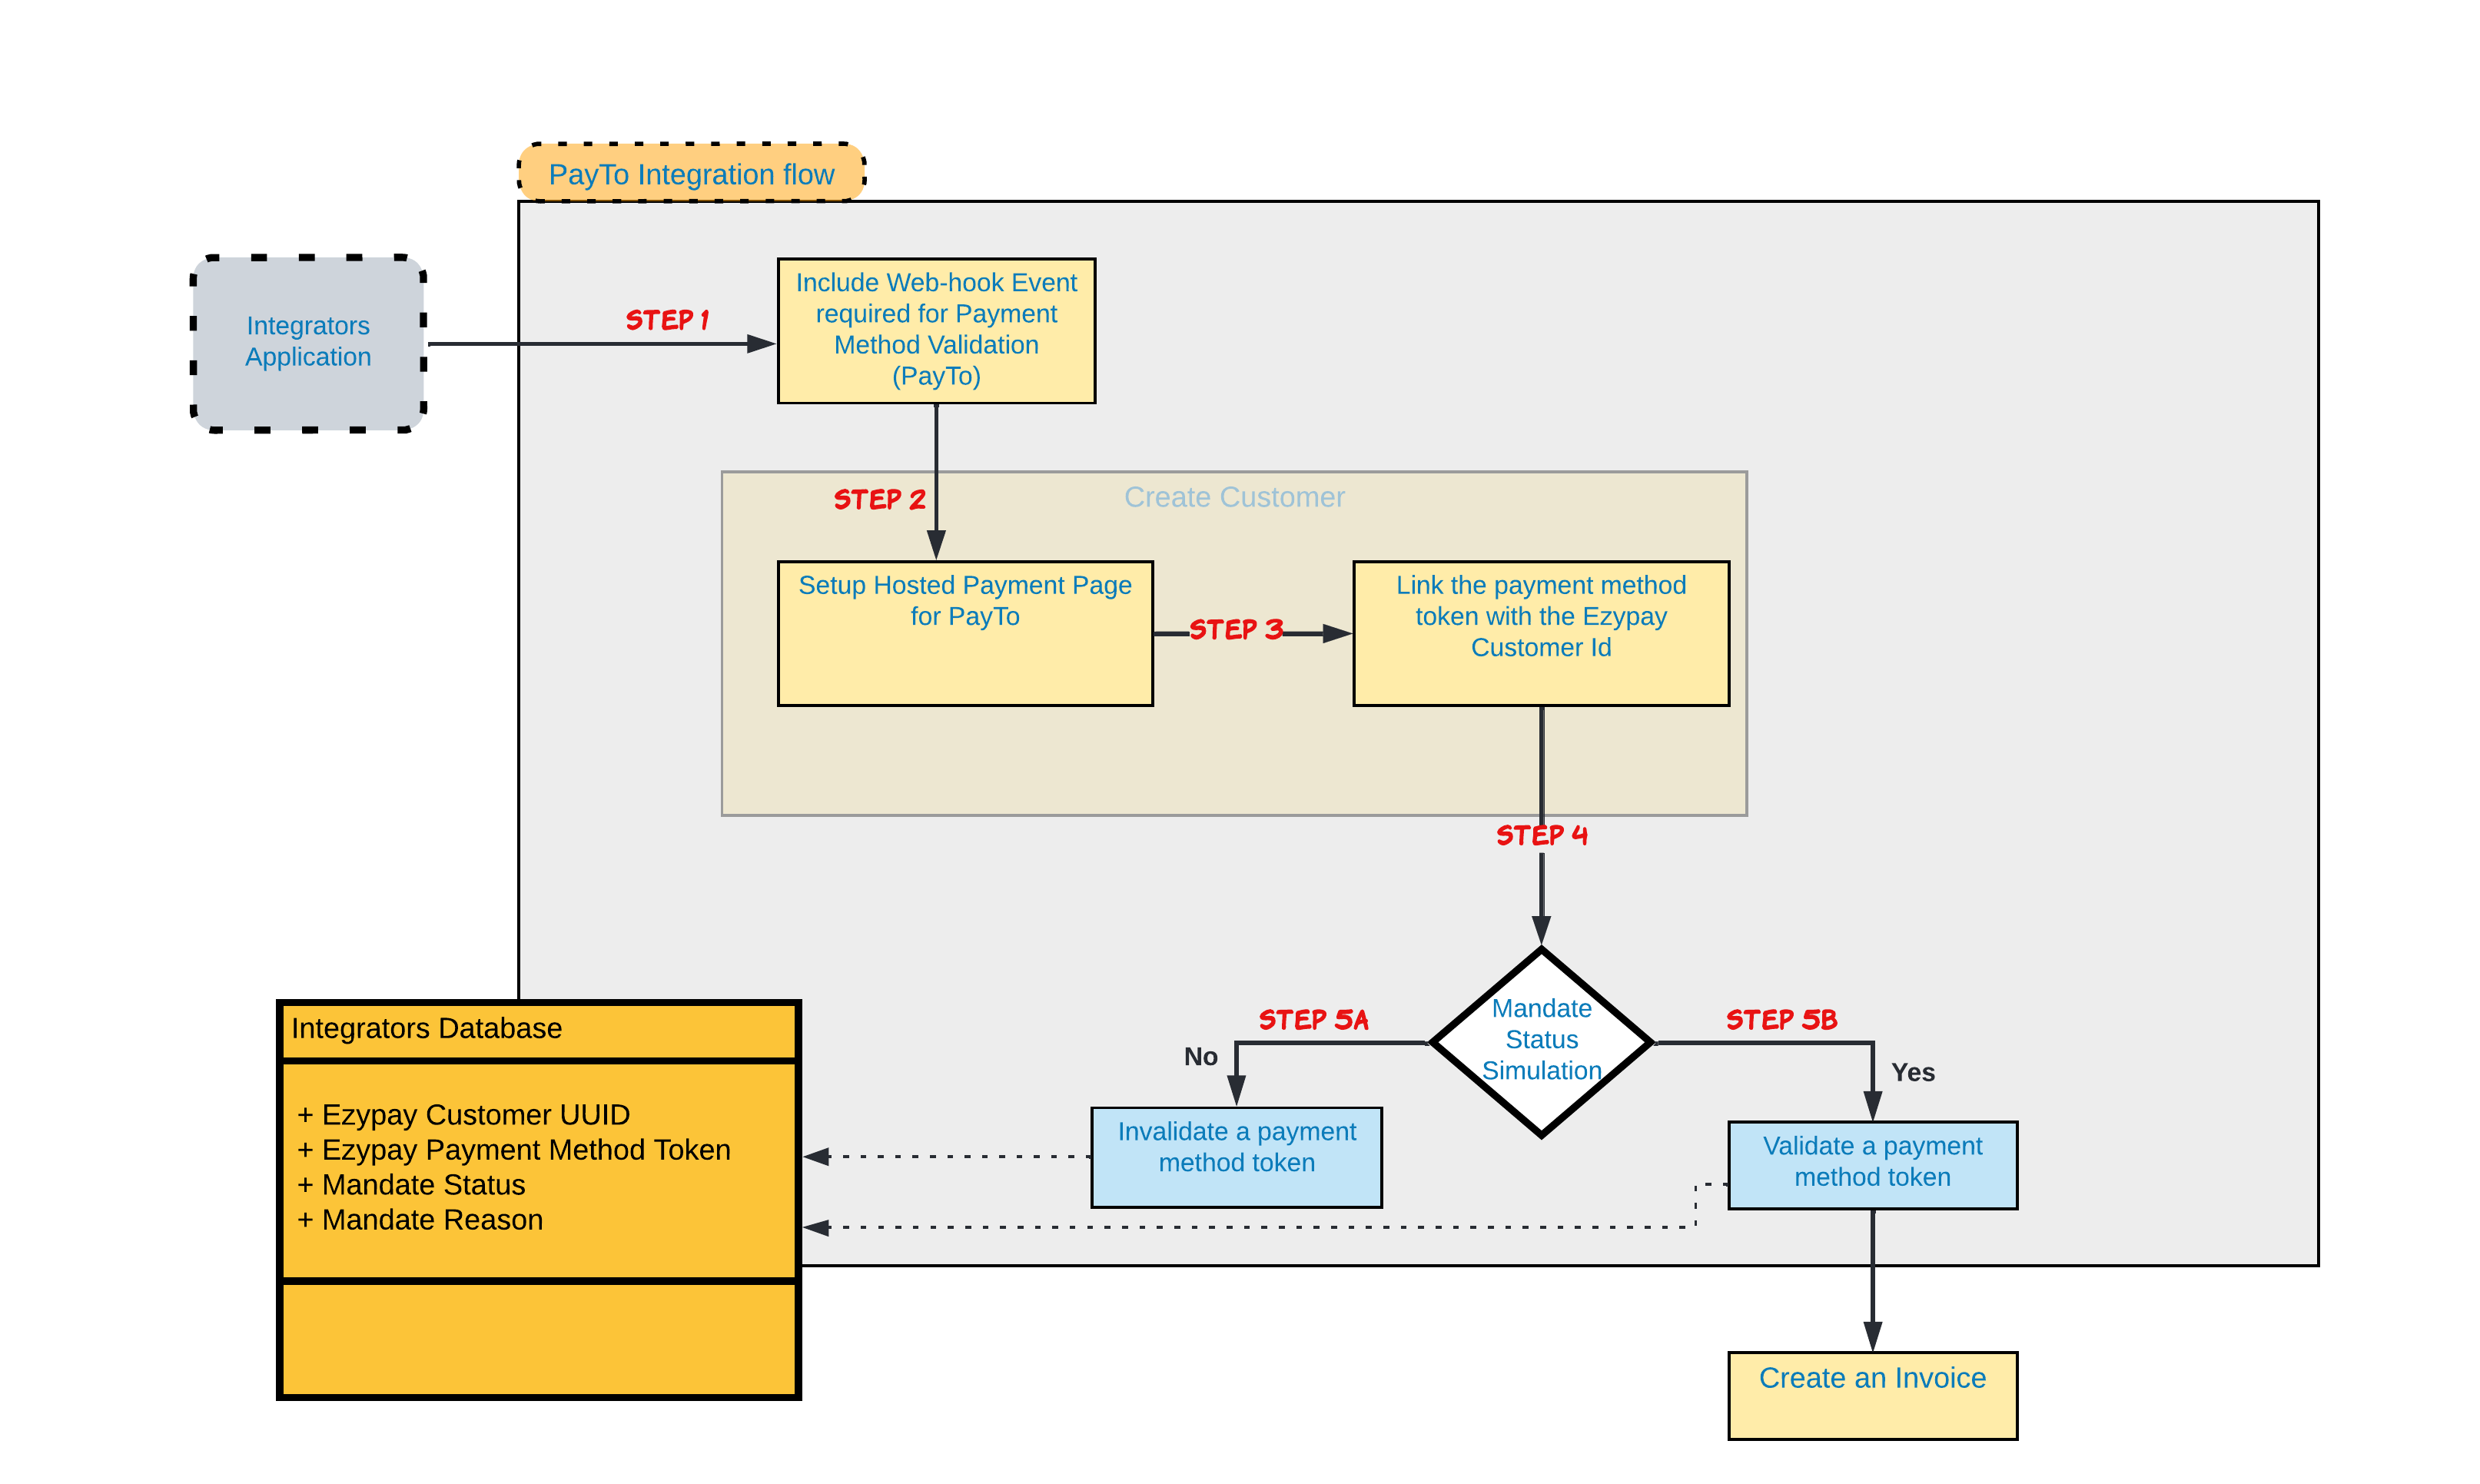
Below is a detailed process flow diagram on the steps required for the PayTo integration:

The PayTo integration is a 5 step process. All the steps must be completed in order for the PayTo integration to be successful.
Step 1: Include Webhook Event Required for Payment Method Validation (PayTo)
As PayTo requires customers to authorise a mandate before any transactions can be processed. It is important that these webhooks be used.
Include these webhooks event:
a) "payment_method_linked"
b) "payment_method_valid"
c) "payment_method_invalid".
To understand how you can setup the webhook in Ezypay, please proceed to the webhook article in this link.
Invoice creation can only be pushed for collection after the PayTo payment method has been validated.
Important information from the payload:
Integrators need to keep the "MandateStatus" status and "MandateReason" to manage what will need to be action next. Do note that the status from the "MandateStatus" status and "MandateReason" will be subjected to changes in the later future.
Step 2: Setting Up Hosted Payment Page for PayTo
Ensure that the merchant has PayTo enabled for this step to work.
How to get PayTo Payment Option available on your application?
Pass the "mandateTypeId" field as part of the hosted payment page condition. To understand how you can retrieve the "mandateTypeId" look at the document in this link.
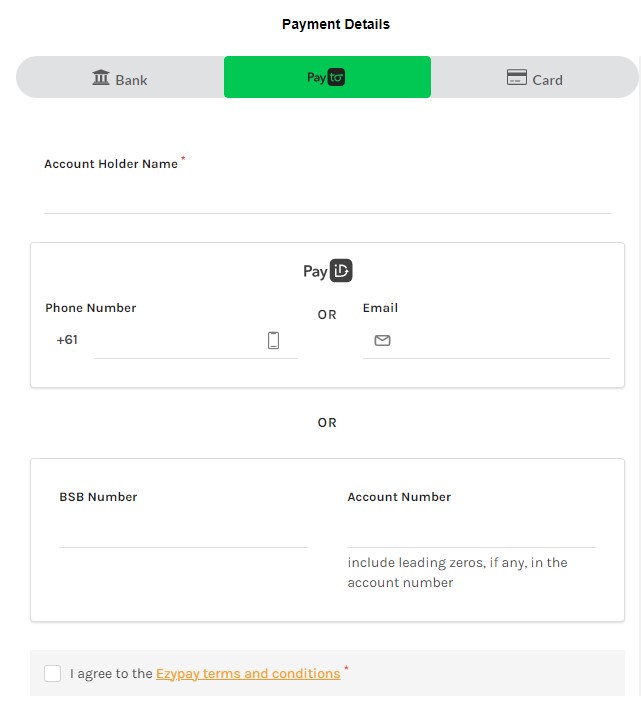
By using this field this option will automatically include all enabled payment options for the merchant. Below is an example of the Hosted Payment Page if PayTo payment method has been enabled.
Integrators can go to this link for details on using the Ezypay Hosted Payment page.
Special Note
Use the below to test the PayTo payment creation first:
This is subjected to change. Use this mock account to test PayTo.
Integrators can use the mock account provided in this link.
There are 2 ways that a user can select which account they would like to use for their payments. They can either use their PayID or manually enter in their bank account number.

Example of hosted payment page with the PayTo option
A more detailed guide to how to create the Hosted Payment Page can be found in this link.
Step 3: Link the Payment Method Token with the Ezypay Customer Id
Ensure the customer and the payment method is linked together before creating an invoice.
The API reference can be found in this link.
Once the customer id and the payment method is linked, this will kick start the agreement process.
The first webhook event returned will be the "payment_method_linked" with the "MandateStatus" as "CRTD".
Next step for what integrators will need to look out for can be found in the table below. Depending on what integrators get from the "payToMandateStatus", there will be actions required from the merchants.
Step 4: PayTo Payment Method Validity Status
Integrators needs to know what the payment method status and reason is. The statuses are listed below.
Each status will lead you to your your action.
Details and example of the full webhook response, click here
Full Description of the PayTo webhook Payload can be found here
Test scenario:
- Test a payment method that will return a "payment_method_invalid" webhook event first.
- Follow up with testing a payment method that will return a "payment_method_valid" webhook event.
Step 4a: Action for a (PayTo) _Invalid _Payment Method
API Endpoint (Cancelled Agreement):
https://api-sandbox.ezypay.com/v2/npp/mandate/status/{{paymentMethodToken}}/mock
curl --location --request POST 'https://api-sandbox.ezypay.com/v2/npp/mandate/status/{{paymentMethodToken}}/mock' \
--header 'Content-Type: application/x-www-form-urlencoded' \
--header 'Authorization: Bearer {{AuthenticationToken}}' \
--data-urlencode 'mandateStatus=CNCD'
What needs to be validated:
- a) Ensure that the "payment_method_linked" is returned with the "payToMandateStatus" as "CRTD".
- b) The next webhook event return should be the "payment_method_invalid" with the "payToMandateStatus" as "CNCD".
- c) Ensure a notice will be sent to the customer for them to re-create a new PayTo payment method.
- d) Confirm the new PayTo payment method is replaced with the previous "invalid" payment method.
- e) Delete the invalid payment method after replacing the Payment Method Token.
Step 4b: Action for a (PayTo) _Valid _Payment Method
API Endpoint (Activated Agreement):
https://api-sandbox.ezypay.com/v2/npp/mandate/status/{{paymentMethodToken}}/mock
curl --location --request POST 'https://api-sandbox.ezypay.com/v2/npp/mandate/status/{{paymentMethodToken}}/mock' \
--header 'Content-Type: application/x-www-form-urlencoded' \
--header 'Authorization: Bearer {{AuthenticationToken}}' \
--data-urlencode 'mandateStatus=ACTV'
What needs to be validated:
- a) Ensure that the "payment_method_linked" is returned with the "payToMandateStatus" as "CRTD".
- b) The next webhook event return should be the "payment_method_valid" with the "payToMandateStatus" as "ACTV".
- c) Ensure that an invoice is able to be generated with this condition.
*The key details to consume from the payload response:
......
"payTo": {
     .....
      "payToMandateStatus": "CRTD",
      "payToMandateReason": "Created.",
      .....
    },
 ....
Once the "payToMandateStatus" (CRTD) is returned, this indicates that the customer agreement has been created, and Integrators will need to provide this update to the merchant that the agreement needs to be "activated" before an invoice can be created in Ezypay.
Table below show what actions you you should take based on each
| Webhook event | payToMandateStatus (payToMandateReason) | Description | Action |
|---|---|---|---|
| payment_method_linked | CRTD (Created) | Agreement is created, need to wait for approval from customer. | This response will be provided in the "payment_method_linked" webhook event. Integrators need to wait until Ezypay returns with either the status of "ACTV" or "CNCD" to proceed with the next action. |
| payment_method_valid | ACTV (Activated) | Agreement has been approved (and activated) by the customer, can start creating invoices. | Integrators can start generating invoices via Ezypay using the PayTo payment method, once they received this status. |
| payment_method_invalid | CNCD (Cancelled) | Agreement is not valid either due to an "expired" agreement to a "rejected" agreement triggered by the customer. | Integrators will need to have process to re-create a new payment method token and replace it with the required customer. |
| payment_method_invalid | SUSD (Suspended) | Agreement was suspended/put on hold by the customer or merchant. | No payments will be attempted while the agreement is in a suspended status. Merchants will need to reach out to their customer to get them to resume their agreement through their banking app. NOTE: Do not recreate a new agreement. |
Important Note:
Ezypay will continue to update our integrators if there will be potential changes to the "payToMandateStatus" in the future.
Some Behaviour Changes:
Although most of the current process remains the same, regardless if the PayTo payment method is used or not, there are some important factors that will require some attention.
- PayTo transact payments instantly, returning a "PAID" or "PAST_DUE" status similar to how a CARD payment option behaves.
- PayTo will have any Ezypay Failed Payment notification (PAY NOW) option available.
- PayTo will not be included into Ezypay's checkout session feature.
Important Note
PayTo details and statuses can subject to changes. Ezypay will notify users of changes when necessary.
Updated 4 months ago
For more detailed explanation on PayTo agreements and PayTo Statuses: